Friday, April 12, 2013

Gridlock Tailored Jacket WIP and fabric giveaway...

Tessuti are currently running a sewing competition using their fabric called "Gridlock". You can sew anything you like using this fabric for your chance to win $1000! Sounds great, so of course I went online and ordered a couple of meters.

I was in the middle of sewing my Hot Summer Rose outfit when the comp started so didn't really get going on it until about a week ago. I had my mind set on sewing a tailored jacket for some reason. Perhaps because I have seen some great tailored jackets on the runway and RTW lately. I envisioned a pair of tailored shorts to go with it. The comp finishes tomorrow night (April 3rd) when I will be sailing the high seas to Tasmania with my boys. Unfortunately I am nowhere near finished, in fact I really have just started as far as tailored jackets go. It has taken me a week to cut all the many many pieces of muslin, lining, organza, lining, canvas etc etc. I have just started hand sewing the canvas to the front.

Love this look

Even though I won't be able to enter it in the comp, I am still eager to get it done. Here is my work in progress report so far.
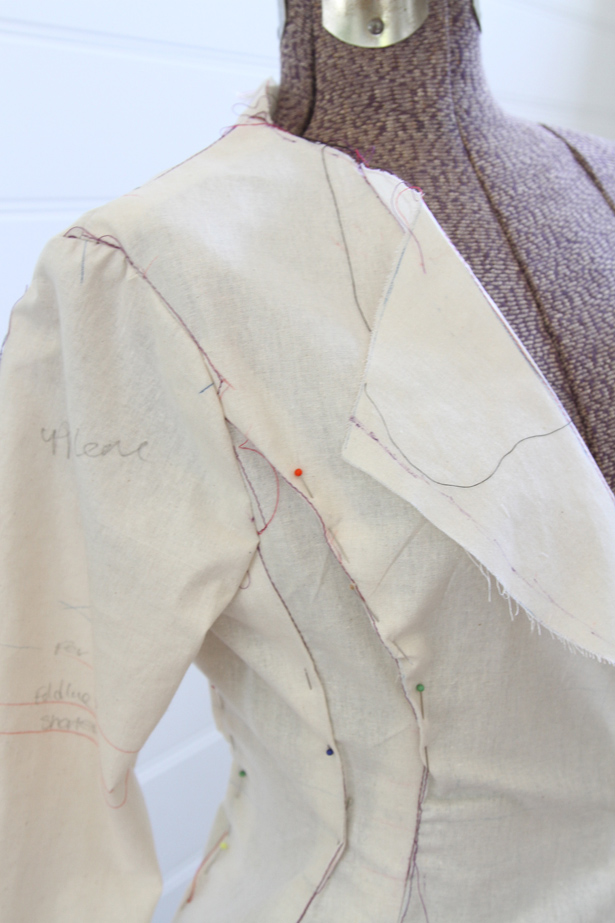

I traced all the seams and notches onto the calico to create a muslin. I also thread marked all of the seam lines. I had thought about skipping this process as I had googled it and alot of people had thought it was a bit of a waste of time but I totally disagree. I think that it has saved me alot of heartache down the track. It makes lining up the seams really accurate.
I made a few adjustments to the muslin. 
Thread marked all of the seams. I went off a bit on a few...oops!


I tailored tacked all of the markings from the calico muslin onto the Gridlock fabric


Catchstitching the canvas to the darts

So this is as far as I got before leaving for Tassie. More to come...
I have 80cm of this Gridlock fabric from Tessuti to give away. Fabric is a double-sided Jacaranda blue/ivory 77% Poly 21% Cotton 2% Elastane jacquard. Width:125cm 

I think it would be the perfect amount for a cute little A line skirt or some funky shorts or maybe a vest? 
Check out these amazing creations made for the competition at Tessuti and congratulations to the winners. Just leave a comment below and sign up to follow me. I'll pick a random "winner" on April 30th.

Sunday, March 24, 2013

Hot Summer Rose

I love the name of this fabric "Hot summer Roses". I picked it up from Tessuti last year. I think they have sold out now. It is a cotton/spandex mix which is machine washable... bonus! I have a tendency to buy fabrics that need dry cleaning and tend not to wear them as I can't be bothered with the cleaning process.
I had pinned a photo to my pinterest board last year thinking I would make the strapless top and skinny pants to match. I decided on a mini skirt instead as I didn't have quite enough fabric.  I used Burda pattern 01/2012 leather bustier #124 for the bodice and drafted my own peplum. For the skirt I used Burda Magazine 7/2012 120 skirt which I also made up in the RTW designer knock off competition. I really love this skirt pattern. It has a really high waist and curved darts which start at the side seam right at waist level. It's a really good fit.
I boned and lined the bodice which I've never done before. I use a herringbone stitch to sew the boning tape in place and hand stitched the lining to the bodice. I also attached a grosgrain ribbon to the upper bodice to help with the fit. I picked up this technique from Gertie's sew retro bombshell dress lesson which was a really handy tip. I haven't sewn the bombshell dress yet but I have used a few techniques from this lesson and have found it really easy to follow.  Gertie's not your stereotypical sewing teacher which I love.
I have a very small bust so I had to take it in quite a bit. I adjusted it at the seam lines by shaving off about 1 cm. I also shortened the bodice.
I had a question on my last dress on how I get the bodice to fit so well on my small frame. Basically, I fit and fit and fit. I will fit to the dress form and pin where I see any bagginess at all. I then sew and re fit. If it needs adjusting still, I will undo and redo. I am not happy until the fit is good.
I could not live without my dress form. If you don't have one, get one. I picked mine up form EBay for fifty bucks and its been worth every cent. Also boning does wonders for your bust! The bodice stays up really well. 
I lined the skirt as I didn't think the fabric was firm enough. The spandex in it is probably not the best choice for a bustier but it turned out OK. The fit feels great although I think the boning is pushing into the waistline a bit too much. I may have to unpick and shave off a few mm's . I'll wear it tonight to my friends house for dinner and see how comfy it is.
I have loved sewing this outfit. It came together really well and I love the mix of machine and couture techniques.
I highly recommend both of the patterns.
Construction of Bodice
Burda Magazine 7/2012 120 skirt 

01/2012 leather bustier #124

Friday, March 15, 2013

Bat Boy Cape

My challenge today was to create a Batman outfit in roughly two hours. Why? Because I promised my son that I would buy him a new Batman outfit for not crying when I dropped him off at School. Poor little fella, he just started Prep this year and has not been coping very well at all. I've been using lots of bribes and this one seemed to work. One small problem though, it was one o'clock already and I hadn't got out to the shops to buy him his promised cape. Suddenly my little brain started ticking...I have loads of fabric and I can sew,  I'll sew him a cape before 3pm. This what I came up with.


Luckily, we had a cute little Batman tee in the drawer.


The black satin was left over lining from my RTW knock off dress 


I had some blue felt stuffed in a drawer to whip up a mask


The star fabric had been in my stash for a few years waiting for the right project


The gold satin was left over lining from my skin art dress


No more tears for this happy little Vegemite.


A few pics of the cape in the making.
All done, packed in my bag for School pick up.
He was thrilled!

This was easy to make. Just find two pieces of fabric (about half a meter) and fold in half.
Cut a neck line on the fold. I traced off an old cape that was falling apart. Cut diagonally down from the edge of the neck line until it meets the selvages. Then cut a nice curve along the bottom. 
Attach your Superhero applique on the back of the cape. I traced mine using a pic from the web.
Cut and sew a couple of straps and attach by sandwiching between the cape and lining (right sides together) and then sew all the way around the cape leaving an opening to pull it back through.
Edge stitch the opening closed. Voila!